How to Plant Garlic: A Beginner’s Guide to Growing Flavor at Home
One of the easiest and most gratifying crops for home gardeners to raise is garlic. Learning how to plant garlic may be enjoyable and fulfilling, regardless of your level of gardening experience. Garlic’s strong flavor enhances a variety of recipes, and it also keeps well in storage and naturally repels pests in the garden.
Everything you need to know about planting garlic, from picking the best type to harvesting those tasty bulbs, will be covered in this book.
Why Grow Garlic?
Here are some reasons why garlic merits a place in your garden before we get into the specifics:
• Low Maintenance: Once planted, garlic requires minimal care.
• Space Efficient: You don’t need a large plot—garlic can even be grown in containers.
• Long Shelf Life: Properly cured garlic lasts for months.
• Health Benefits: Garlic is rich in antioxidants and known for its antibacterial properties.
• Natural Pest Control: Garlic in your garden can deter pests like aphids and snails.
Step 1: Choose the Right Garlic Variety
There are two primary varieties of garlic: soft neck and hard neck.

Hard neck Garlic
• Grows well in cold climates
• Produces a flower stalk or “scape” (which is edible!)
• Stronger flavor, but shorter shelf life
Soft neck Garlic
• Prefers milder climates
• Doesn’t produce scapes
• Milder flavor, longer storage life
If you’re unsure which type to grow, check what grows best in your region or try both to see which you prefer.
Tip: Avoid using garlic from the grocery store, as it may be treated with chemicals that prevent sprouting. Purchase seed garlic from a trusted garden supplier or local nursery.
Step 2: When to Plant Garlic
In the fall, four to six weeks before the ground freezes, garlic is usually sown. Before winter arrives, this allows the cloves to establish roots without becoming very above ground.
Garlic can be grown in late fall or even early winter in warmer areas. Although fall planting typically produces better results, some gardeners in particularly mild climates also plant in the early spring.
Step 3: Prepare Your Planting Site
Garlic thrives in rich, well-drained soil that is high in organic materials. For optimal outcomes, adhere to following steps:
Choose a Sunny Spot
Garlic needs 6–8 hours of sunlight daily.
Improve Your Soil
• Loosen the soil to about 8 inches deep.
• Mix in compost or well-rotted manure.
• Ensure the pH is slightly acidic to neutral (6.0 to 7.0).
Avoid Wet Feet
Soggy roots are disliked by garlic. If your soil is rich with clay, you might choose to plant in mounds or raised beds.
Step 4: Prepare the Garlic Cloves
1. Break apart the bulb into individual cloves—but don’t peel them!
2. Choose the largest, healthiest cloves for planting.
3. Discard any cloves that are soft, shriveled, or moldy.
Note: Each clove will grow into a whole new bulb.
Step 5: Planting the Garlic
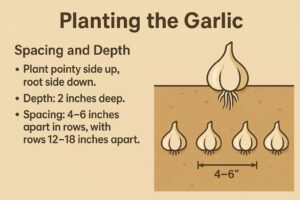
Spacing and Depth
• Plant pointy side up, root side down.
• Depth: 2 inches deep.
• Spacing: 4–6 inches apart in rows, with rows 12–18 inches apart.
Mulching
Apply a 3–4 inch layer of mulch, such as straw or crushed leaves, after planting. Mulch helps keep the cloves moist and protects them in the winter.
Step 6: Garlic Care Through the Seasons
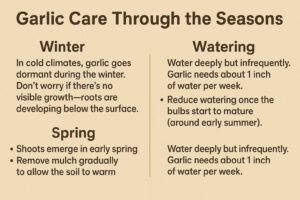
Winter
• In cold climates, garlic goes dormant during the winter. Don’t worry if there’s no visible growth—roots are developing below the surface.
Spring
• Shoots emerge in early spring.
• Remove mulch gradually to allow the soil to warm.
• Fertilize with nitrogen-rich compost or a balanced organic fertilizer.
Watering
• Water deeply but infrequently. Garlic needs about 1 inch of water per week.
• Reduce watering once the bulbs start to mature (around early summer).
Step 7: Managing Pests and Problems
Garlic is generally resistant to many pests and diseases, but here are a few things to watch out for:
• Onion maggots: Use row covers and practice crop rotation.
• Fungal issues: Avoid overwatering and ensure good air circulation.
• Yellowing leaves: Could be due to lack of nutrients or overwatering.
Step 8: Harvesting Garlic
Garlic is typically ready to harvest in mid to late summer, about 7–8 months after planting.
Signs It’s Time to Harvest:
• Lower leaves begin to yellow and die back.
• The top 5–6 leaves are still green.
Use a garden fork to gently lift the bulbs—don’t pull them out by hand, as you risk damaging the neck.
Step 9: Curing and Storing Garlic
Curing
• Lay garlic out in a single layer in a dry, shaded, and well-ventilated area (like a shed or garage).
• Allow it to cure for 2–3 weeks.
• Don’t wash garlic after harvesting—just brush off excess dirt.
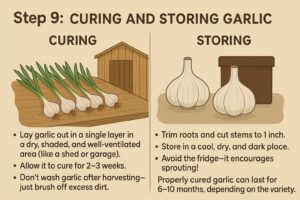
Storing
• Trim roots and cut stems to 1 inch.
• Store in a cool, dry, and dark place.
• Avoid the fridge—it encourages sprouting!
Properly cured garlic can last for 6–10 months, depending on the variety.
Bonus: Save Some Cloves for Replanting
Save your largest and best bulbs for the following growing season. Your garlic will eventually become more suited to the soil and climate in your area.
Final Thoughts
The technique of growing garlic is straightforward but incredibly satisfying. It offers great flavor and utility with minimal space and maintenance. Garlic is a great addition to any home garden, whether you utilize it for its culinary purposes, for its therapeutic qualities, or just because you love growing your own food.
Happy planting—and don’t forget to savor those homegrown cloves in your favorite dishes!