How to Care for Baby Chicks: A Step-by-Step Guide for Beginners
Raising baby chicks can be a rewarding experience for those interested in homesteading, farming, or even just keeping backyard chickens. However, as a beginner, it can feel overwhelming to know exactly what your chicks need to thrive. From providing the right environment to meeting their nutritional requirements, there are several key factors to consider when caring for baby chicks. This step-by-step guide will walk you through everything you need to know to ensure your baby chicks grow up healthy, strong, and happy.
Step 1: Setting Up the Brooder
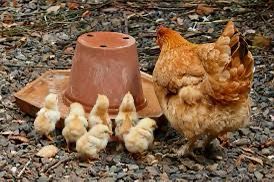
The brooder is the home for your baby chicks during the first few weeks of their life. It needs to be a safe, warm, and clean space that mimics the comfort and protection they would receive from their mother hen. Here’s how to set up a proper brooder:
1. Choose the Right Container
A brooder can be any enclosed space where your chicks will feel secure. You can use a plastic storage container, a large cardboard box, or a purpose-built brooder. Just ensure it’s high enough to prevent the chicks from escaping but low enough that they can easily reach the food and water.
2. Provide Bedding
Bedding is essential for comfort and cleanliness. Pine shavings or straw work well because they are absorbent and easy to clean. Avoid using cedar shavings, as their strong scent can be harmful to chicks. Line the bottom of the brooder with about 1-2 inches of bedding.
3. Ensure Proper Ventilation
The brooder should be well-ventilated to avoid buildup of ammonia or heat. Make sure there are holes or openings to allow fresh air to circulate, but not so many that the chicks can escape. Also, avoid drafts which can make the chicks cold.
4. Heat Source
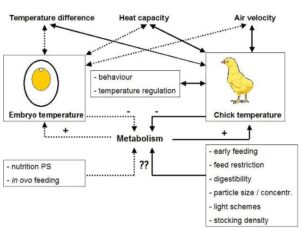
Baby chicks need warmth, as they are not able to regulate their body temperature for the first few weeks. A heat lamp or heat plate is typically used to provide consistent warmth. For the first week, the temperature should be around 95°F (35°C), and then reduce it by about 5°F each week until they’re fully feathered at around 6-8 weeks old.
Always monitor the temperature in the brooder using a thermometer. If the chicks huddle together under the heat source, they might be too cold. If they’re spreading out and panting, they may be too hot. Adjust the heat source accordingly.
Step 2: Providing Food and Water
Proper nutrition is crucial for the healthy development of baby chicks. A good feeding routine and clean water are essential for their growth.
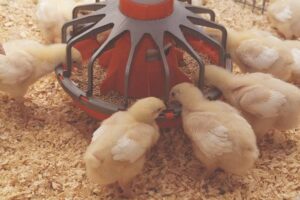
1. Choose the Right Feed
Baby chicks require a special diet formulated for their specific needs. Look for a chick starter feed that is high in protein (around 18-20%) to support their rapid growth. You can choose between medicated or non-medicated feed. Medicated feed can help prevent certain diseases like coccidiosis, but some people prefer to avoid it due to concerns over medication.
2. Feeding Frequency
Offer food to the chicks as often as they want to eat. During the first few days, you can provide feed ad libitum (free choice), ensuring they always have access to fresh food. Gradually, they will learn to eat as needed.
3. Water Availability
Fresh, clean water is essential for baby chicks. Ensure they always have access to it. Use a shallow water container to prevent drowning, and ensure that the water stays clean. You can add a little poultry vitamin supplement to the water to help boost their immune systems.
4. Avoid Grit
Baby chicks don’t need grit in their diet until they start eating solid food like grains or bugs, which usually happens at around 2-3 weeks of age. Before then, their starter feed is soft enough to be digested without the need for grit.
Step 3: Maintaining the Right Temperature and Humidity
Baby chicks are highly sensitive to temperature and humidity, especially in the first few weeks. It’s important to monitor these environmental factors to ensure your chicks are comfortable and healthy.
1. Maintaining Temperature
As mentioned earlier, the temperature in the brooder should be about 95°F during the first week. This temperature should be gradually reduced by 5°F every week until the chicks are fully feathered (around 6-8 weeks old). The brooder’s heat source, whether a lamp or a heat plate, should be positioned in such a way that the chicks can move away from the warmth if they need to.
2. Humidity Levels
Humidity is also a consideration, particularly if you’re raising chicks in an area with very dry air. If the air is too dry, chicks can become dehydrated, and their respiratory systems can become stressed. Aim to keep the humidity levels at 40-60%, especially in the first few days. You can use a humidifier or place a wet towel in the brooder to help control the humidity.
Step 4: Socialization and Handling
Baby chicks are social animals that need interaction to become well-adjusted adult chickens. Socializing them in the early stages will make them easier to handle later on.
1. Gentle Handling
Chicks are fragile, so handle them gently. Wash your hands before and after interacting with them to prevent the spread of diseases. Hold them for short periods, and avoid squeezing or stressing them out.
2. Encouraging Social Behavior
Chicks will bond with each other and learn how to behave as chickens by observing their flock mates. Ensure that they have plenty of space to roam and interact with each other. This is crucial for their development.
3. Introducing Other Animals
If you have other pets, especially dogs or cats, make sure they are supervised and kept at a safe distance from the chicks. Even well-meaning pets can accidentally harm a chick.
Step 5: Health Care and Monitoring

Keeping an eye on your chicks’ health is vital, as they are vulnerable to several diseases and infections during their early stages of life.
1. Watch for Signs of Illness
Common symptoms of illness in chicks include lethargy, loss of appetite, pasty vent (a sign of diarrhea), or unusual behavior. If you notice any of these symptoms, isolate the sick chick from the others and consult a veterinarian.
2. Coccidiosis Prevention
Coccidiosis is a common parasite that affects baby chicks and can cause severe illness. It’s often present in the environment, and chicks can contract it if their brooder is not kept clean. To prevent it, keep the brooder dry, clean, and free from fecal matter. If you’re using medicated feed, it may help reduce the risk of coccidiosis.
3. Vaccinations and Treatments
Some vaccines are recommended for chicks, depending on your region and the risks they may face. Speak with a local vet or poultry expert to find out which vaccines may be necessary. Additionally, regularly check for signs of external parasites, like mites or lice, which can affect chicks.
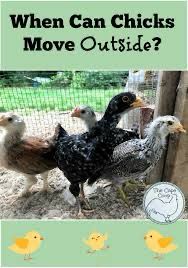
Step 6: Transitioning to the Outdoors
At around 6-8 weeks, when your chicks are fully feathered and the weather is warm, they can be gradually transitioned to an outdoor coop.
. Prepare the Coop
Ensure the coop is secure from predators, dry, and provides plenty of space for the chicks to roam. You’ll need to transition them slowly, allowing them to acclimate to the temperature difference between the brooder and the outdoor coop.
2. Gradual Transition
Start by placing the chicks outside for a few hours a day, gradually increasing the time spent outdoors. This will help them adjust to the temperature and become accustomed to their new environment.
3. Ongoing Care
Once your chicks are outside, continue to monitor their behavior, food, and water intake. Make sure the coop remains clean and safe, and that they have plenty of space to roam and forage.
Conclusion
Caring for baby chicks requires careful attention to their environment, nutrition, and health. By following these steps and maintaining a watchful eye, you can ensure that your chicks grow up healthy and strong. Whether you’re raising chickens for eggs, meat, or simply as pets, the early stages of life are crucial for their development. With the right care, your baby chicks will grow into happy and productive adult chickens, providing you with years of enjoyment and benefits.