
Homemade Treat Recipes for Dogs & Cats: Healthy, Easy, and Tail-Wagging Good
As pet parents, we’re always on the lookout for the best ways to show our furry friends how much we love them. One of the easiest and most rewarding ways? Whipping up homemade treats right in your kitchen. Not only do homemade pet treats allow you to control the ingredients, but they also help you avoid preservatives, additives, and fillers commonly found in store-bought options.
In this blog post, we’ll explore the benefits of homemade treats, safety tips, and share a few simple, vet-approved recipes your dog or cat will adore.
Why Make Homemade Treats?

1. Control Over Ingredients
Making treats at home lets you avoid artificial colors, preservatives, and low-quality ingredients that may trigger allergies or digestive issues.
2. Customization
You can tailor recipes to meet your pet’s dietary needs—whether it’s grain-free, low-fat, or high in protein.
3. Freshness
Homemade treats are free from long shelf-life preservatives, making them fresher and often more nutritious.
4. Bonding Time
Preparing treats is a fun way to include your pet in family life. Plus, they’ll love taste-testing your creations!
Safety Tips Before You Start

• Avoid Toxic Foods: Never use chocolate, onions, garlic, raisins, grapes, xylitol, alcohol, or caffeine. These can be toxic to pets.
• Portion Control: Treats should make up no more than 10% of your pet’s daily caloric intake.
• Check Allergies: Introduce one ingredient at a time to ensure no adverse reactions.
Homemade Dog Treat Recipes
1. Peanut Butter & Banana Bites
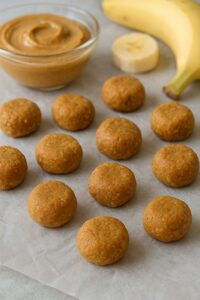
Ingredients:
• 1 ripe banana
• 1 cup oat flour (or rolled oats blended into flour)
• 1/2 cup natural peanut butter (no xylitol)
Instructions:
1. Preheat oven to 350°F (175°C).
2. Mash the banana in a bowl and mix with peanut butter.
3. Stir in oat flour until a dough forms.
4. Roll out and cut into shapes using cookie cutters.
5. Bake for 15–20 minutes or until golden brown.
6. Let cool and store in an airtight container for up to a week.
2. Chicken & Sweet Potato Jerky

Ingredients:
• 1 cooked chicken breast, shredded
• 1/2 cup mashed sweet potato
• 1 egg
• 1/4 cup oat flour
Instructions:
1. Preheat oven to 325°F (160°C).
2. Mix all ingredients into a thick paste.
3. Form small flat strips and place them on a baking sheet lined with parchment paper.
4. Bake for 25–30 minutes or until firm.
5. Let cool and refrigerate. Use within 5–7 days.
Homemade Cat Treat Recipes
1. Tuna & Catnip Bites

Ingredients:
• 1 can of tuna in water (drained)
• 1 egg
• 1 tablespoon dried catnip
• 1/4 cup oat flour
Instructions:
1. Preheat oven to 325°F (160°C).
2. Blend tuna, egg, catnip, and oat flour until a thick dough forms.
3. Roll into tiny balls or flatten into coin-sized shapes.
4. Bake for 10–12 minutes.
5. Cool and store in an airtight container for up to a week.
2. Salmon Crunchies

Ingredients:
• 1/2 cup canned salmon (no bones)
• 1 egg
• 1 tablespoon parsley (optional)
• 1/2 cup whole wheat flour
Instructions:
1. Preheat oven to 350°F (175°C).
2. Mix all ingredients in a bowl until dough forms.
3. Roll out and cut into small bite-sized pieces.
4. Place on a baking sheet and bake for 15–20 minutes.
5. Allow to cool completely before serving.
Storage Tips

• Most homemade treats will last 5–7 days in the fridge.
• You can freeze extras for up to 2 months. Just thaw before serving.
• Use airtight containers to retain freshness and prevent moisture.
Final Thoughts
Homemade pet treats are a fantastic way to express your love while keeping your furry friends healthy and happy. Whether you’re baking peanut butter bones for your pup or mixing up catnip crunchies for your feline, these simple recipes are sure to become household favorites.
Plus, once you get the hang of it, you can start experimenting with ingredients your pet enjoys. Just remember to keep it safe, balanced, and made with love.