The Best Homemade Vanilla Ice Cream (No Machine Needed!)
preparing your own ice cream at home has a certain charm because of its creamy texture, the beautiful vanilla scent that fills your kitchen, and the satisfaction that comes from preparing something delicious by hand. The finest aspect? Making a batch of delectable homemade vanilla ice cream doesn’t even require an ice cream maker!
I’ll walk you through the process of creating rich, ultra-creamy vanilla ice cream in this blog post using basic ingredients and kitchenware. This simple recipe will quickly become a kitchen mainstay, regardless of your level of experience. Let’s get started!
#Why Make Ice Cream at Home?
Let’s first discuss why creating ice cream at home is revolutionary before moving on to the recipe:
• Quality Control: You get to choose high-quality ingredients without preservatives, artificial flavors, or unnecessary additives.
• Customizable: Want to add chocolate chips, crushed cookies, or swirls of caramel? You’re the boss!
• Satisfaction: There’s a special pride in enjoying a dessert you made from scratch.
• Cost-Effective: Premium ice creams can be pricey. Making your own can save you money, especially if you make it often.
Ingredients You’ll Need
The simplicity of the ingredient list is one of this recipe’s best features:
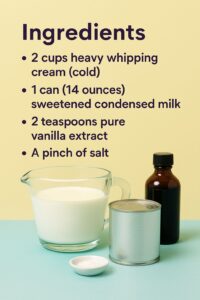
• 2 cups heavy whipping cream (cold)
• 1 can (14 ounces) sweetened condensed milk
• 2 teaspoons pure vanilla extract
• A pinch of salt
That’s it! Four ingredients. No fancy tools, no hidden steps.
Essential Tools
While you won’t need an ice cream maker, having the following tools will make the process easier:
• Large mixing bowl
• Hand mixer or stand mixer (a whisk can work too but will take longer)
• Rubber spatula
• Freezer-safe container (a loaf pan works beautifully)
• Plastic wrap or a lid
Step-by-Step Recipe
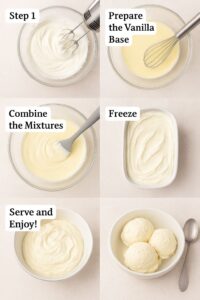
Step 1: Whip the Cream
Pour the cool heavy whipping cream into a large mixing bowl. Beat the cream on medium-high speed with a hand mixer or stand mixer until stiff peaks form. It should take three to five minutes.
Tip: Don’t overbeat — you want it fluffy and soft, not turning into butter!
Step 2: Prepare the Vanilla Base
Combine the sweetened condensed milk, vanilla extract, and a bit of salt in a separate bowl (or, if you’re being cautious, straight into the condensed milk can). Mix thoroughly.
Step 3: Combine the Mixtures
Using a rubber spatula, gently incorporate the whipped cream into the condensed milk mixture. Fold the whipped cream gently until it’s smooth and even, being careful not to deflate it too much.
Step 4: Freeze
Pour the mixture into a container that can be frozen. To stop ice crystals from forming, use a spatula to smooth the top and then press a piece of plastic wrap straight over the surface.
The ice cream should be solid and scoopable after at least 6 hours, but ideally overnight.
Step 5: Serve and Enjoy!
Remove your handmade vanilla ice cream with a spoon and serve it plain or with your preferred toppings, such as chocolate sauce, sprinkles, fresh berries, or even homemade caramel.
Tips for the Creamiest No-Churn Ice Cream
• Use cold ingredients: Cold cream whips better and holds its structure.
• Quality matters: Use real vanilla extract (not imitation) for the best flavor.
• Don’t rush freezing: Allow enough time for the ice cream to fully set.
• Add-ins: If you want to mix in chocolate chips, cookie crumbles, or fruit, fold them in right after combining the whipped cream and condensed milk.
Flavor Variations
Once you master the basic recipe, you can get creative! Here are a few fun twists:
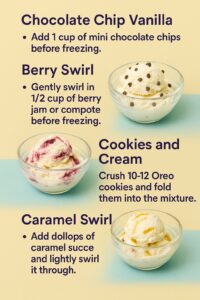
• Chocolate Chip Vanilla: Add 1 cup of mini chocolate chips before freezing.
• Berry Swirl: Gently swirl in 1/2 cup of berry jam or compote before freezing.
• Cookies and Cream: Crush 10-12 Oreo cookies and fold them into the mixture.
• Caramel Swirl: Add dollops of caramel sauce and lightly swirl it through.
The possibilities are endless!
Troubleshooting Common Problems
Why is my ice cream icy and not creamy?
The most common causes of ice crystals are improperly mixed air into the whipped cream or air exposure during freezing. Cover the cream carefully with plastic wrap after whipping it to stiff peaks.
Can I make it less sweet?
Sweetened condensed milk adds both sweetness and structure. Reducing it will change the texture, but you can use less sweet toppings or more salt to balance the flavors.
Can I make it dairy-free?
Yes! Swap heavy cream with full-fat coconut cream and use a dairy-free condensed milk alternative.
Why This No-Churn Method Works
In order to integrate air and avoid big ice crystals, traditional ice cream recipes involve churning. By beating the heavy cream and retaining the air in the mixture, this no-churn variation deftly produces the same creamy texture. There’s no need to constantly mix it because sweetened condensed milk keeps it soft even when frozen.
The end result? Ice cream that’s every bit as luscious, rich, and satisfying as machine-made versions — and so much easier!
Final Thoughts
A timeless treat, homemade vanilla ice cream is easy, nostalgic, and delicious. Even the best store-bought desserts may be made with a few simple ingredients and no special equipment. Additionally, you’ll have the ideal canvas for countless flavor experiments once you polish the basic vanilla!
Therefore, make a batch of this simple, no-churn vanilla ice cream instead of going to the store the next time you have a sweet tooth. You’ll be addicted after just one luscious, creamy taste, I swear!
Have you tried making homemade ice cream before?
I’d love to hear your favorite mix-ins and toppings! Share your creations in the comments below!